
Introduction
I am most definitely the “digital packrat” when it comes to computer hardware. I am never able to part with a piece of hardware, which still works, with the justification of “Hey, you never know.” A case in point: I keep an entire computer system around just to house one optical drive. The drive is Plextor’s famous 12 x 10 x 32 CD rewriter (the 1st one with buffer underrun technology). I am still attached to this drive (perhaps the $250 price tag has something to do with it), as more than once in the past, when other drives failed; the Plextor came through for me. Unfortunately, I do not have room for it in any of my more “modern” systems. So it sits installed in a 1997 Compaq Presario taking up precious space. Honestly, I haven’t had to power up the Compaq in at least two years (maybe more), but that is beside the point, hey you never know when you’ll need it ready to go.
 The Belkin External Drive Enclosure is designed for folks with just this type of need. With it, you can convert an internal optical drive, or a hard drive to work across a USB 2.0 or Firewire connection. This should enable me to put my older system curbside, while retaining the functionality of the Plextor CD rewritable drive. I have a collection of optical drives and hard drives that would be great to be able to access, yet currently have no room for them in my current systems. Let’s see if Belkin’s External Drive Enclosure can come to the rescue.
What’s In The Box
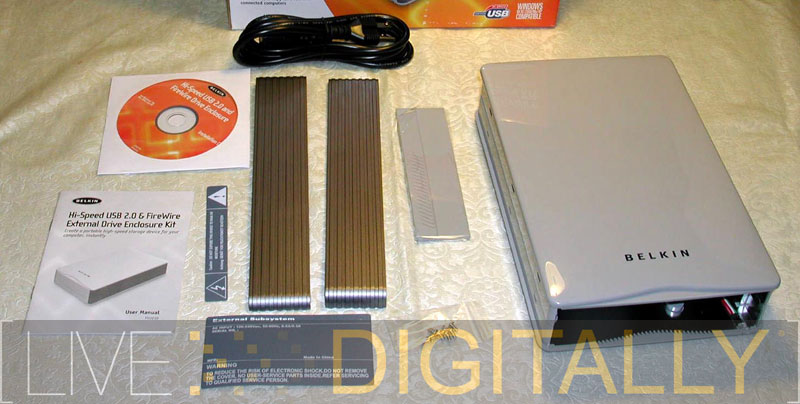
-external enclosure, top and bottom
-power cord
-two side trim pieces
-front trim piece
-drivers for Windows 98 SE
-instruction manual
-two electrical caution stickers
-fine and coarse screws (4 of each)
Putting It All Together
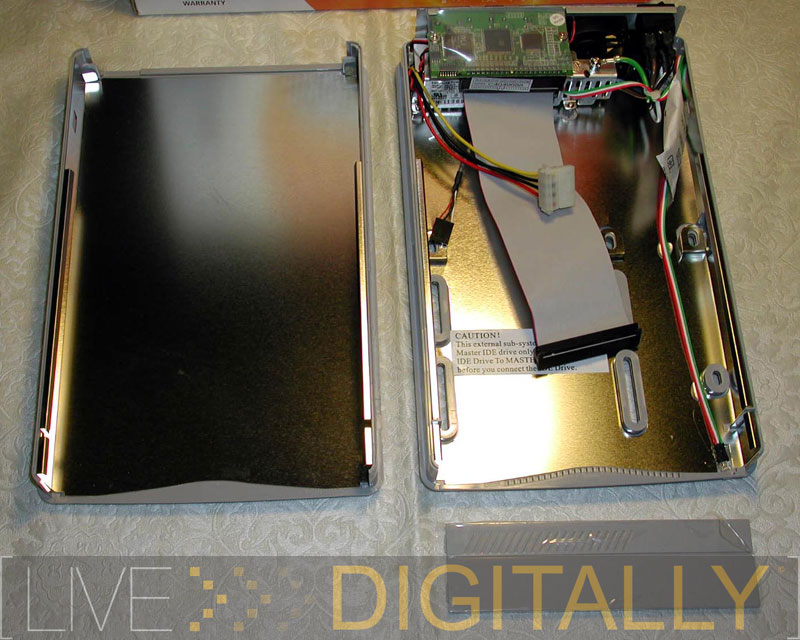
The assembly of the Belkin External Drive Enclosure was Lego block simple. The manual was almost superfluous, and only took about 10 minutes to put this together. The toughest step is deciding which drive to install!
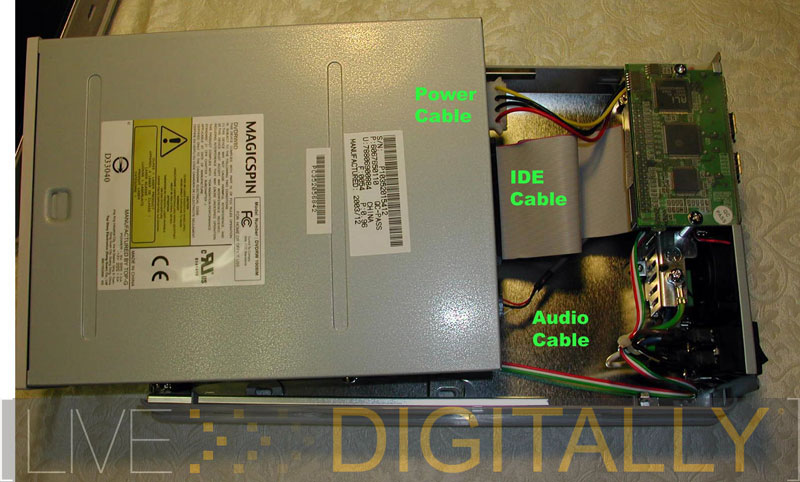
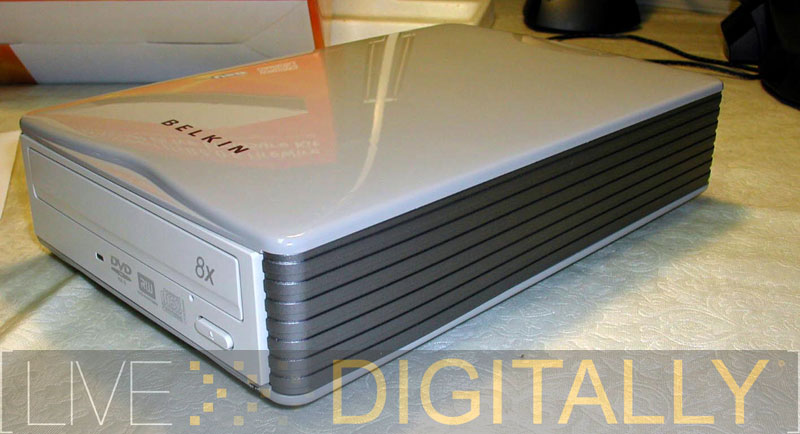
I chose a DVD writer from I/O Magic, with an 8x DVD+R burn speed for the initial build. The drive is notable for being one of the longer optical drives available with a 19 cm length. Make sure the drive jumper is set to the “master” position (as opposed to “slave”) or the drive will not be recognized. Then three cables are plugged into the drive from the enclosure: the IDE cable, power, and audio. Incidentally, these are the same cables you would connect for an internal installation.
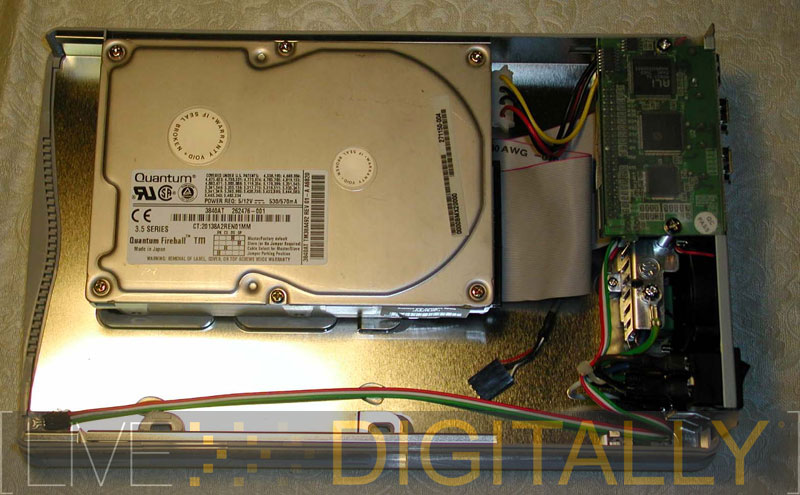
 The drive gets secured to the bottom piece of the enclosure with 4 screws from the bottom. (I never even realized that these drives had screw holes in the bottom as they are attached from the sides in desktop systems). Belkin provides both coarse and fine screws, check to see which fits better before you install the drive to avoid cross threading. The precut holes matched up perfectly, and it was set in place with the coarse screws. The top piece was easily placed over the bottom and snapped down. There were two side pieces that lock the whole assembly together, and give a more finished look to it.
 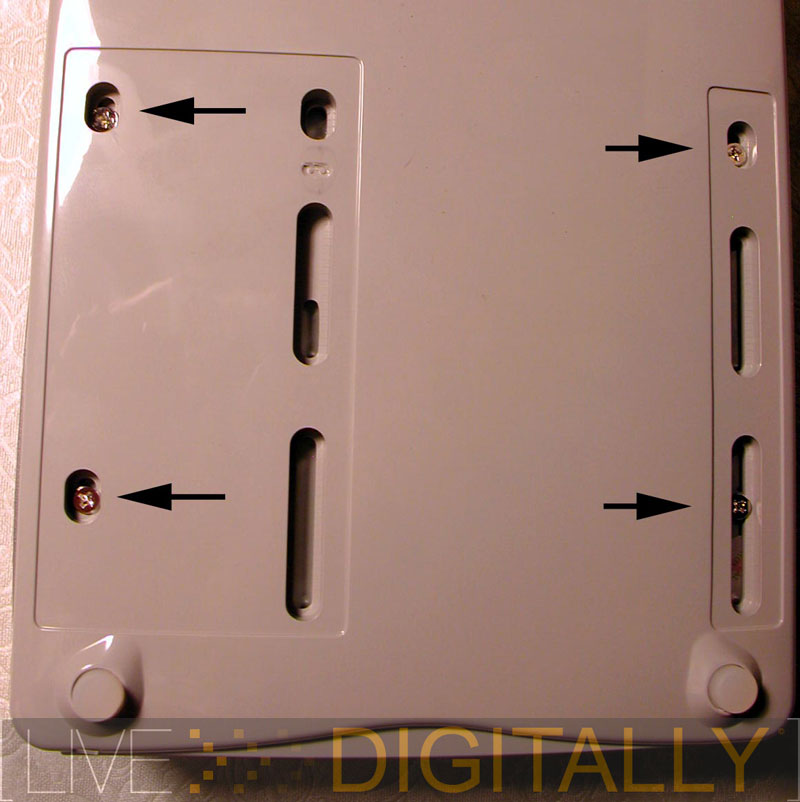 There are two “electrical caution” stickers to be placed onto the bottom of the device. I didn’t put these on as then I couldn’t take it apart to insert another drive. Finally, a power supply cable, and USB or Firewire cable are inserted into the rear of the external enclosure. No driver was needed on both Windows ME and XP systems, as this uses the “mass storage device” category that other removable storage devices (such as USB flash drives) use. For Windows 98SE users, it is time to upgrade, but a driver is supplied on a CD in the box. There is no other software on the disk.
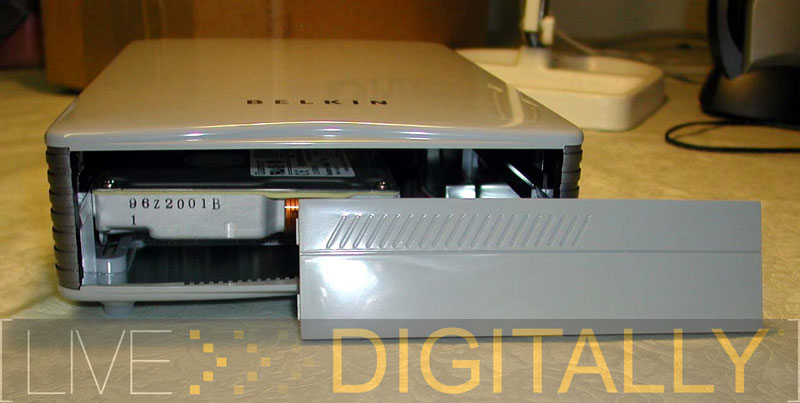
 Assembling the Belkin External Drive Enclosure as a hard drive enclosure employs the same steps, with one addition. There is a supplied trim piece that covers the front of the enclosure. The trim piece snaps into place, and serves to keep dust away from the hard drive which is always a good thing. Install the trim piece after the side rails are in place, or it will not fit correctly.
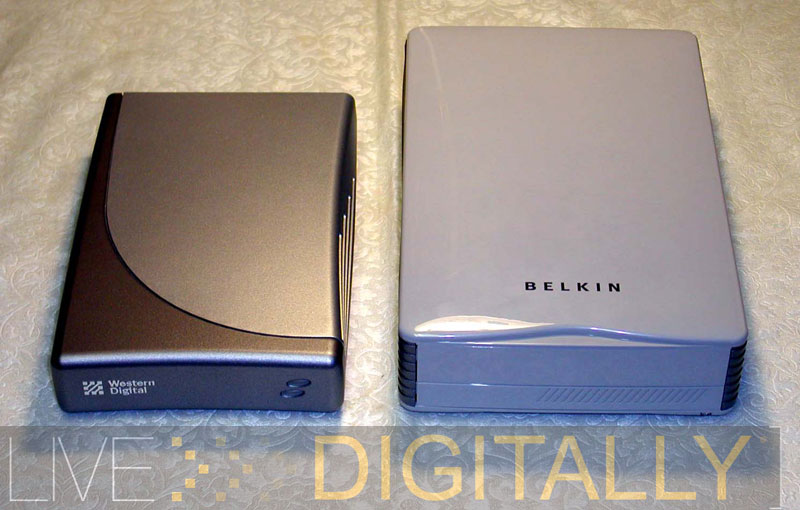
Overall, I was pleased with how simple the build was, and how quickly it could be put together and also, taken apart. Finally, the finished product looked quite professional, and not like some kit. The two tone gray color scheme is well chosen by Belkin to coordinate with a variety of computers, other accessories, and decors. Because the external enclosure can house a larger optical drive, it is larger than my external USB hard drive from Western Digital.

Performance
 The drive enclosure has its own power supply, and switch to control the power. There is also a single, multicolor LED that glows green for reading, and orange for writing. This corresponds to the hard drive activity lamp found on most computers, and provides good feedback. It’s nice to be able to check this before removing the drive, so as to not corrupt the precious data if it’s still being written.
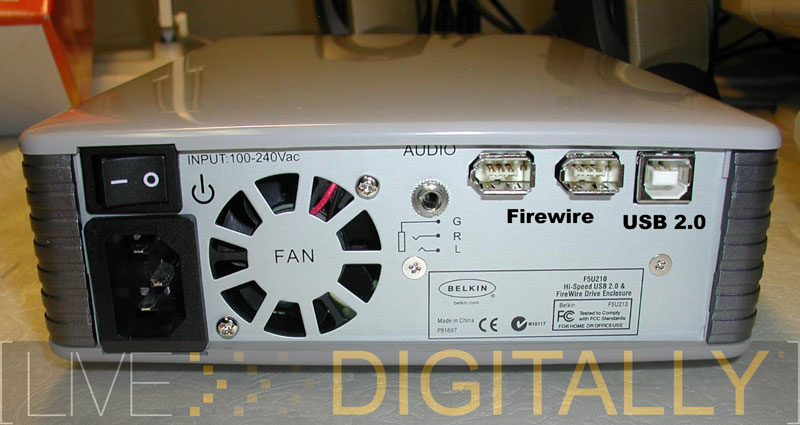
Looking at the back of the enclosure, I’d like to make some observations. First, there is a genuine, old fashioned, on/off switch. While obvious, and too often taken for granted, this has become a premium feature as some manufacturers have eliminated this to save money (my Western Digital 120 GB external hard drive has no switch). Second, you will notice that there are both USB, and two six pin FireWire connectors. The enclosure will also work with older USB 1.1 connections; albeit s-l-o-w-l-y (I tested it on a Windows ME desktop with USB 1.1). Third, there is a headphone jack, which gets labeled audio which intrigued me (the included manual didn’t mention it at all). I popped a music disc in the drive and plugged my headphones in. Than I realized there was no play button on the drive, only an eject button. In general, the optical drives that have a play button (in addition to the eject button) also have a headphone jack directly on the drive that bypasses the computer system to play music (this was useful for an occasional music CD on a system without a sound card). Also, with a hard drive installed in the enclosure, the audio jack was completely useless as well. While I suppose that there was at some point an optical drive made with a play button and no headphone jack, to me this feature was about as useful as an air conditioner in Antarctica during a blizzard. My recommendation to Belkin is to keep the on/off switch, and lose the audio jack. In 2005, with color iPod’s and Sansa’s available, I doubt that anyone would use this feature anyway.
I went through my shoebox of parts, and pulled out a Quantum Fireball 3.59 GB hard drive. While rather outdated, I was curious to see if it still worked, and what data, if any, it was storing. The hard drive was popped into Belkin External Hard Drive Enclosure with ease, and I was up and running in a few short minutes.
The drive connected to both Windows XP, and older Windows ME machines easily, and were recognized without any driver. The old Quantum Fireball hard drive fired right up, and made the clatter and spinning sounds that have been engineered out of its descendants. The fan was on in the external enclosure, but it was quiet and unobtrusive.
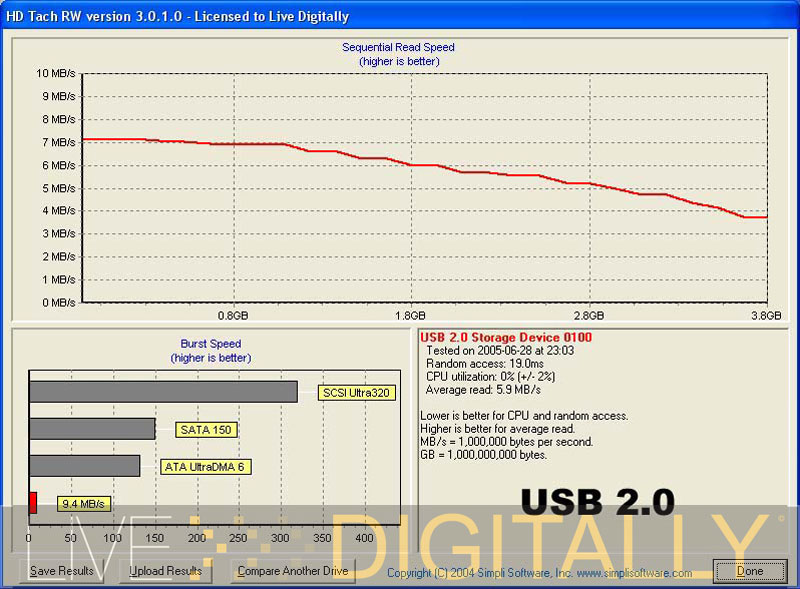
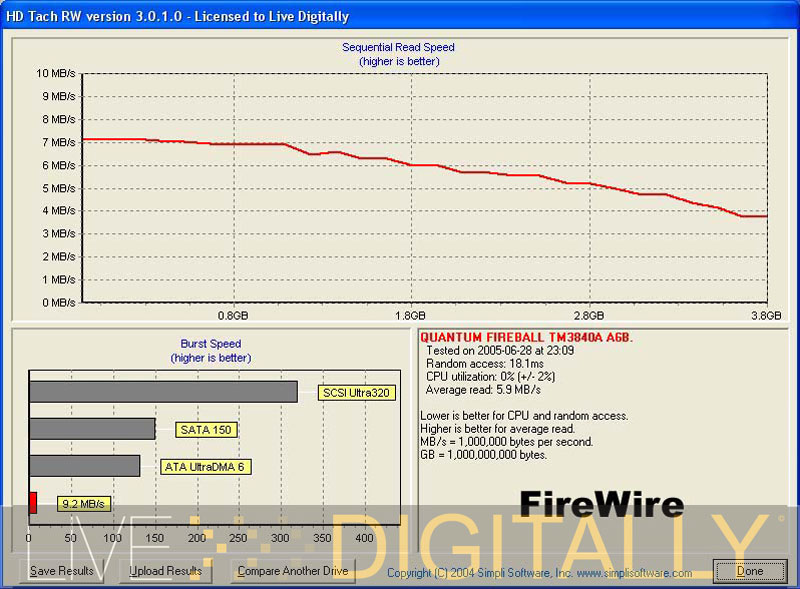
I decided to examine the drive’s performance using Simpli Software’s HD Tach 3.0.1.0 utility. You’ll recall that FireWire is rated for 400 megabits per second, and USB is slightly faster at 480 megabits per second. This is the first FireWire peripheral I have used, and it connected and was recognized just like in USB. I ran HD Tach, and saw that the numbers were identical between the two different types of connections with an average read speed of 5.9 MB/s. In the end, either FireWire, or USB 2.0 are much faster than the drive, so the old hard drive is limiting the speed, and not the connection (which is the way it should be). Of note, I did find some pictures on the hard drive, so you never know what you’ll find with a little effort.
Next, I was off to do a real world test. I transferred 453 MP3 files which totaled 1.14 GB, stored in 10 folders. The USB 2.0 connection was slightly faster and averaged 4.75 MB/s, while the FireWire ran at 4.54 MB/s. While both connections were limited by the hard drive speed (more like lack thereof), the USB is slightly faster. Without a stopwatch though, no one would ever notice that small difference in speed. Both FireWire and USB were tested using a three foot long cable.
Now it was on to some optical drive testing. I decided to install my I/O Magic 8x (BTC 1008) DVDRW in Belkin’s External Enclosure. For comparison, I have already generated performance numbers for this drive while it was installed in the same desktop system with the same firmware. I/O Magic’s drive, in retrospect, is still an outstanding reader of discs, and excellent at writing CD’s, although it’s DVD writing abilities are rather mediocre. I also was curious to see how the drive would perform in an external enclosure, compared to when installed internally.
In my opinion, one of the most demanding tasks of an optical drive, even today, is still digital audio extraction speed. This is how fast a music CD can be read, for conversion into MP3 files. I had tested the I/O Magic DVDRW 8x on this task, and had come up with an average speed of 31x, with a range of 19x to 41x (all drives always read faster as they get to the outer edge of the disc). The drive was installed on an IDE connection as a master, on the secondary channel. I repeated the same task with the drive in the Belkin External Drive Enclosure, using both the FireWire and USB 2.0 connections. The following graphs were generated.
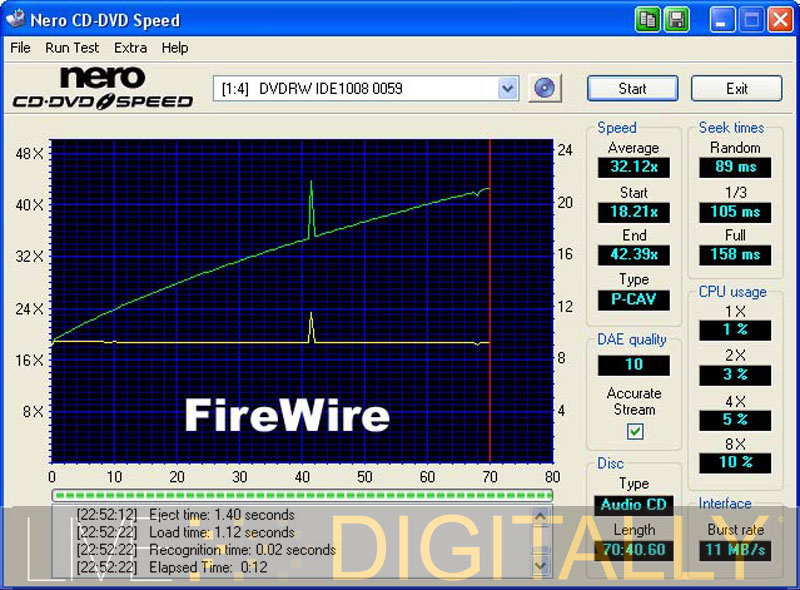
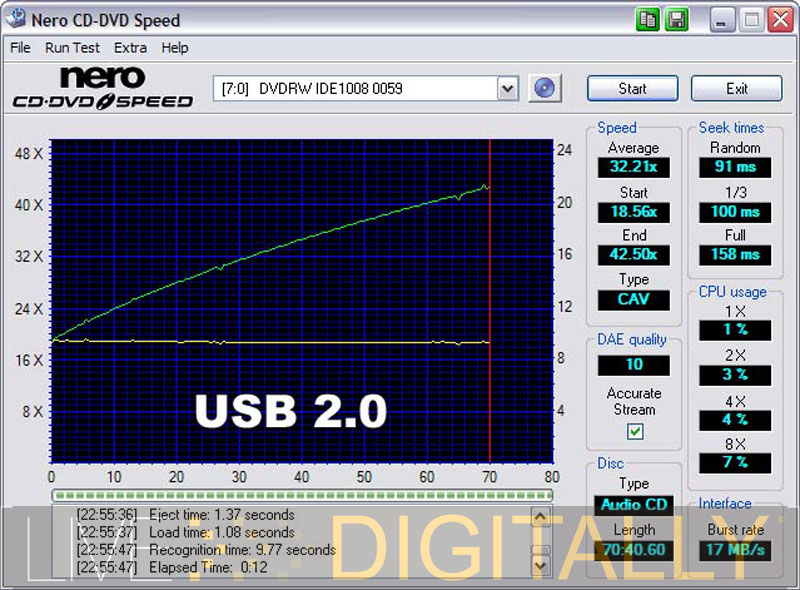
From the two CD Speed graphs, we can see that the drive performed at full speed in the external drive enclosure. I was pleasantly surprised to see that being in the enclosure did not degrade the performance in any way. This is very impressive as an internally connected drive is supposed to be the fastest. At any rate, the connection chosen did not limit the drive as it was all dependent on the drive itself. I personally liked the FireWire connection very much as it was rock stable, and it freed up a USB port (always in short supply).
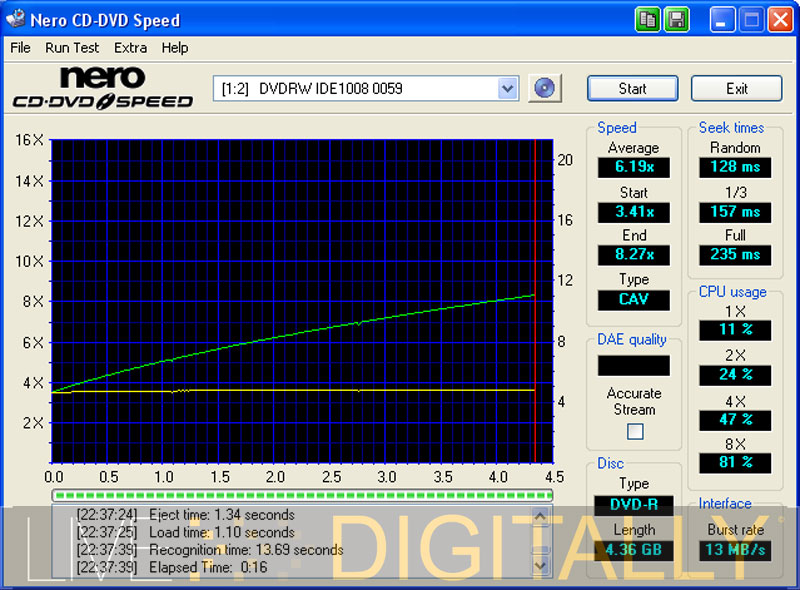 I also ran CD Speed reading a single layer DVD and generated this graph utilizing the FireWire connection. The Belkin External Drive Enclosure does a great job of letting the optical drive do its thing, and transmitting the data at full speed.
Strengths/Weaknesses
Strengths
-USB and FireWire compatible
-very easy to assemble
-two color LED conveys read/write info
-quiet operation
-driver not needed
-high quality fit & finish
-included coarse and fine screws hold drive securely
-lifetime warranty
-on/off switch
-attractive color scheme
-fast and stable
Weaknesses
-cables not included
-larger than some preassembled external hard drive products
-electrical caution stickers block access to screws
-poorly documented audio jack
Who Should Buy This?
The drive maven with a variety of optical, as well as hard drives will benefit most from Belkin’s External Drive Enclosure. If you have more drives than systems to put them into, than this is the product for you. If you’ve got optical drives piled up, this is the device to get them back to work. It’s also great to access that old hard drive’s data, and share it between multiple systems.
The notebook user who uses a desktop replacement system as their main system would also benefit greatly. For example, my notebook’s optical drive (LiteOn 852S) can only read DVD’s at 8x, and write CD’s at 24x, and this is the state of the art currently. If you are converting a large number of your CD’s to MP3’s for your music player, you could cut the job time in half with a 52x CDRW installed in the enclosure. Also, optical drives in notebooks are notoriously difficult to upgrade due to issues of compatibility, and cost. I plan on using the I/O Magic DVDRW drive in the Belkin enclosure when docked for faster reading and writing, and save the slower internal optical drive for road use. Older notebooks with even slower optical drives, or that can’t deal with DVD discs will benefit even more with this inexpensive upgrade. Another benefit is you can choose from any optical drive, and in general, external optical drives carry a price premium and are not always the latest compared to internal offerings.
Aficionados of small form factor pc’s looking for room for one more drive would do well to have this in their arsenal as well.
Conclusion
Belkin’s External Drive Enclosure is the “digital shoebox” found. Users can access their optical drives and hard drives without opening their boxes and modifying their systems. The device proved stable across a variety of tests, and multiple systems using USB 1.1, 2.0, and FireWire connections. Both USB and FireWire were faster than both drives tested, and this is quite fast. The Belkin External Drive Enclosure is another “LD Approved” product.
Special thanks to Belkin for supporting this review.
Great Review!!!
I have one of these but bought it used and it was already assembled with a 120GB drive in it. I am trying to pop it open to put a bigger drive in there but have no idea how to open it without damaging the plastic.
Any ideas?
Thank you.
You need more than 120 GB; you certainly are more of a digital packrat than I am. The key to opening Belkin’s enclosure up is popping open the ridged side rails. Start at the back of the unit. If they’re very tight you may need to sild a small screwdriver to get them started. Glad you enjoyed the review!
Dear Jeremy, Your tip on how to open the enclosure was a lifesaver !!! Thanks so much for your exceptional website !
Glenn